

A Complete Introduction to Git
A comprehensive beginner-friendly Introduction to Version Control using Git


Note: This post is a rewrite based on an old post of mine. I ended up adding a few more words, but trust me, you would enjoy reading it.
Introduction
Git is an open-source distributed version control system created by Linus Torvalds in 2005 so that he could collaborate with others contributing to the kernel development of his disruptive new free Operating System called Linux.
Although Git is used primarily by programmers for tracking changes in the source code of the software they are developing, it can be used for tracking changes in any set of files and directories. This post is a complete introduction to Git, for everyone who wants to read the fundamental principles along with the basic usage.
How Git Works
The best explanation of how Git works can be found on the official Git website in the Pro Git Book, which says how Git is a storage of Snapshots, Not Differences, which makes it stand out from every other VCS (Version Control System) or SCM (Source Code Manager) out there. While most other systems store information as a list of file-based changes (commonly described as delta-based version control), Git stores the information about a project as a Repository of a Series of Snapshots of a Miniature Filesystem.
A Repository is nothing but a special directory used by Git that represents the entire history of the project in the form of these series of snapshots. (Image 1). Every time you take these snapshots, what you really do, is create a Commit, or a reference of the state of all the files and directories staged (marked ready for the snapshot), represented by an SHA-1 checksum of this state. If files have not changed, to make it more efficient, Git doesn’t store the file again, but just a link to the previous identical file it has already stored. When you commit your changes, these committed snapshots can be thought of as “safe” versions of a project, meaning Git will never change them unless you explicitly ask it to.
Git generally only adds data. When you perform actions in Git, nearly all of them only add data to the Git database. As a result, it is quite hard, although not impossible, to lose any data, or get the system to do anything that is not undoable (an example of this exception is a forced push, which is discouraged during important contributions). Because everything in Git is checksummed before it is stored, Git provides integrity to the history of the developments of a repository, because it is almost impossible to update or remove any information in your project without Git knowing about it.
When you are working as a collaborator on a project using Git, you are often accessing and contributing changes, most certainly using some popular words like branch, commit, diff, fetch, merge and so many more. Git is a very exhaustive software with gives a lot of features for Source Control Management. There are so many things to learn and use in Git, one could always learn some more. In this post, I would try to only lay out the most fundamental commands and actions that are used by everyone contributing to a project, along with mentioning a few popular terminologies used while using Git.
Getting Started
When you need Git in your project, you need to first install it (if not already installed) in your system by following the instructions in the Official Git Website here. Verify if Git is installed by using the following command in the terminal:
git --version
Next, you can configure your Git environment by setting some common configuration variables. To see all your configuration settings, use the command:
git config --list
To enable the Git SCM in your project for the first time, you just need to run the command
git init
This installs a Git directory .git/ with all the files and objects Git needs to track your project based on the following three main entities:
The
.gitDirectoryLocated in
<YOUR-PROJECT-ROOT-PATH>/.git/, this directory which is created first, after agit init, represents your entire Repository, where Git stores everything it needs to accurately track the project. This includes metadata, and an object database which includes compressed versions of the project files.The Working Directory (or Working Tree)
This is where a user makes their local changes to a project. The working directory pulls the project’s files from the Git directory’s object database and places them on the user’s local machine.
Staging Area
The Staging Area is a file (also called the “index”, “stage”, or “cache”) that stores information about what will go into your next commit. Staging is therefore the process of adding or removing files to the staging area to be committed. A commit is when you tell Git to save these staged changes. Git takes a snapshot of the files as they are and permanently stores that snapshot in the Git directory.

Contributing Changes
When you already have Git tracking your project, you can see the changes you make within the Working Directory of your project. Each file in your working directory can be in one of two states: tracked or untracked. Tracked files are files that were in the last snapshot, as well as any newly staged files. You can check the status of your working tree with the command:
git status
This shows all the important details about your project like the current branch, along with all the changes, staged or un-staged, that Git is tracking to add and commit to the repository. You can see the changes using the command:
git diff
Check out the official docs on git diff to know about all the ways this command can be used.
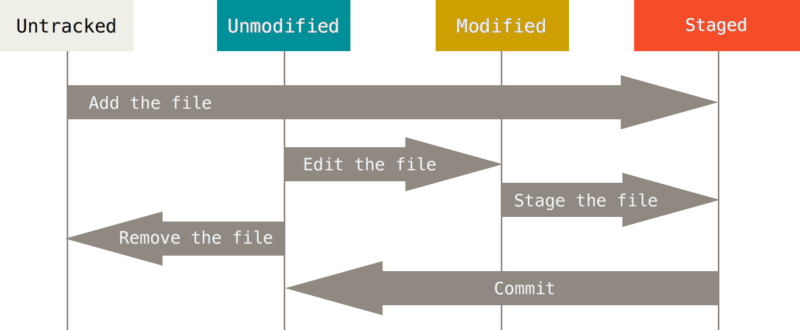
Now, when you are ready to publish the changes you have worked on, you add them to the staging area, using the git add command followed by the names of all the files and directories that you want to commit or snapshot. Example:
git add file1 file2 dir1/ dir2/file3
If you are not happy with your changes and you want to discard the changes in working directory, use the command git restore:
git restore <file>
Once you are ready with the files added to staging, we can commit the state of the staging area with git commit along with a commit message like this:
git commit -m "add new files for this feature"
Note: This is just a simple hypothetical commit message, not considering any commit message best practice. If want to read about how most developers prefer to write their commit messages, check out my Gist here which explains the popular practice of writing Conventional Commits, which makes your commit messages meaningful for both humans and automated software deployment processes using the project.
To remove an already committed file from Git, we use the git rm command with the files and directories passed in the same way we do for adding.
Branching
Whenever you initialise Git into your project, you create a pointer to the root project directory. If you try to run the command git banch, you could see a response like this:
* master
As you commit more files, you update the latest snapshot of your repository, denoted by a special pointer called the HEAD, containing a reference to the previous commit that came before. A branch in Git is simply a lightweight movable pointer to any one of these commits. Of course, from the result of the git branch command above, you can tell that the default branch name for a new repository in Git is master. Every time you commit, the master branch pointer moves forward automatically, along with the HEAD pointing to the latest commit in the branch.
To work on any new task/issue on a project, it is always advised to create a new branch to avoid making changes directly to the main or trunk branch which is being used by other collaborators as well. This is when we create new branches in a repository.
Let’s say you want to create a new branch called develop to develop a new feature on your project. You can do this with the git branch command followed by the name of the branch you want, in this case, develop:
git branch develop
As you know now from above, the HEAD is a pointer to the local branch you’re currently on. In this case, you’re still on master. The git branch command only created a new branch — it didn’t switch to that branch.
To switch to the branch, we use the git checkout command, followed by the name of the branch you want to switch to:
git checkout develop
You can create and switch to a new branch using the git checkout command with the -b flag. For example:
git checkout -b develop
The HEAD will start pointing to the develop branch now, and update as you add more commits, to point to the latest commit in the branch.
There are a few more usages of the git checkout command. I have included them in this Cheatsheet of the most useful Git commands for you to refer to anytime.
Publishing your Changes
When working on a collaborative project, each contributor works on a local copy of the project that sits on a remotely hosted repository and periodically updates the remote with their local changes. For that, we use a hosted Git service, like GitHub or GitLab.
If you have not set up a remote for your repository, you can do it by first going to your chosen hosted Git service and creating a blank repository to track your local repository. Once created, you can add the link to your hosted Git repository to your list of remotes being tracked by Git using the git remote command like this:
git remote add <REMOTE_NAME> <YOUR_REMOTE_REPO_LINK>
Usually, we use the name origin for our local repository's <REMOTE_NAME as a commonly used convention. You can give any name or have multiple remotes with different names.
If you want to set a different remote, use the command:
git remote set-url <REMOTE_NAME> <NEW_REMOTE_REPO_LINK>
Like above, the <REMOTE_NAME> denotes your remote called origin in your local copy of your remote repository.
You can view all your remotes using the command:
git remote -v
Now, if you are working on a project where the remote repository is already set up, you usually start with cloning the remote repository into your local system using the git clone command:
git clone <YOUR_REMOTE_REPO_LINK>
Note: This remote repository link is available in 2 ways: via HTTPS, and SSH. The kind of link that we choose determines how we configure our authentication with our remote repository. Usually, it is preferred to access and write data on your remote using SSH (Secure Shell Protocol). When you connect via SSH, you authenticate using a private key file on your local machine. For more information, see "About SSH", and "Setting up your own SSH Authentication".
Once you clone your remote repository to your local machine, it creates a new directory with the same name as the repository, remote-tracking branches for each branch in the cloned repository (visible using git branch --remotes), and checking out into an initial branch that is forked from the cloned repository’s currently active branch. You can get the name of the current branch that you are in using the commands git branch or git status without any arguments.
From now on, you can fetch and publish changes in the repository using just a few simple commands like:
A plain
git fetchwithout arguments, which would update all the remote-tracking branchesA
git pullwithout arguments, which would fetch the updates and additionally merge the remote-trackingorigin/masterbranch into the currentmasterbranch, if any.git pushwhich publishes your changes to the remote repository.A
git pushwithout arguments works only when the is and set the particular branch as the default remote branch for the local repository. To push the changes and set the remote branch as default, run the below command:A
git pushalong with the correct upstream branch specified, publishes your changes to the remote.
Note: Your remote-tracking branches are not the same as your remote branches.
Your remote-tracking branches may look something likeorigin/master, for example, which is just a reference to the last commitHEADfetched from the remote'smaster.
The term that more accurately represents the remote repository that your local repository tracks is upstream.

Whenever you clone a git repository, you get a local copy of it in your system. So, for your local copy, the actual repository is the upstream.
When you clone a forked repository to your local, the forked repository is considered the remote, and the repository you forked from is the upstream.
To set a particular branch (say, master) as your default remote branch for the local repository, and push your changes, run the below command:
git push --set-upstream origin master
Wrapping Up
You now have almost everything you need to know as a complete beginner to get started with Git. As you start using Git more in your workflow, I am sure you would find so many nuances and advanced features. I shall try to share some of them that I have learnt in a later post.
See you in another one!